---
title: Opendock Driver Check-In & Check-Out Resource Guide
description: Maximize Opendock Driver Check-In & Check-Out with proven onboarding tips to improve gate flow, driver compliance, and arrival-to-departure visibility.
---
[](https://opendock.com/#request-a-demo)
[](https://opendock.com/)
[Get a demo](https://opendock.com/#request-a-demo)
[Get a demo](https://opendock.com/save-time-and-money-by-having-your-carriers-book-online/)
[Get a demo](https://opendock.com/#request-a-demo)
# Driver Check-In & Check-Out Resource Guide
Step 1
Step 2
Step 3
Step 4
Step 5
Step 6
Step 7
Example
Learn More
#### Set Up Gate Management for Your Warehouse
Start by configuring the required Gate Management settings in Opendock so drivers know where and how to check in.
- **Update Carrier Instructions**
- Add clear check-in guidance for drivers and save your changes.
- Path: Warehouse → Warehouse Info → Instructions to Carriers → Warehouse General Instructions
- **Configure Required Driver Check-In Fields**
- Add or remove fields as needed. Keep the form simple at first to avoid overwhelming drivers.
- Path: Warehouse → Fields & Forms → Gate & Yard → Check-In → Manage → Add or Remove fields
- **Note:** If Yard Management System (YMS) is enabled, drivers will be prompted to select the **purpose of their trip** during check-in (for example: unload, load, drop, or hook). This helps automatically route arrivals into the appropriate yard workflow.
- **Set Check-In Parameters**
- Set thresholds for checking in early and checking in late.
- Path: Warehouse → Settings → Gate Management → Check-in Early Threshold / Check-in Late Threshold
- ### Set Geofencing Parameters *(Optional)*
Geofencing can be enabled to require drivers to be within a **1-mile radius** of your facility before they are allowed to check in. This adds an extra layer of control and accuracy to the check-in process.
Because geofencing impacts driver workflows and location permissions, it is not typically enabled by default and is best configured with guidance.
- **Recommended next step:**
If you are considering geofencing, we suggest reviewing your use case with your **Account Manager** to ensure it is set up in a way that aligns with your operation and driver experience.
- Path:
Warehouse → Settings → Gate Management → Enforce geofencing (requires drivers to share real-time location)
- **Set Post-Check-In Instructions**
- Define what drivers should do after completing check-in.
**Goal:** Make the check-in process clear and easy for first-time drivers.
#### Prepare the Gate for Driver Self Check-In
Make sure drivers can physically check in and understand exactly what to expect when they arrive.
- [**Download and print the Driver Check-In QR banner**](https://lp.opendock.com/hubfs/Opendock%20Onboarding%20Kit%20Materials/Print%20Check-in%20Banner%20for%20Opendock%20Gate%20Management.pdf?hsLang=en)
- **Create and share a Driver Check-In Guide**
- Help drivers understand the check-in process by using a simple, facility-specific guide.
- Use the Driver [**Check-In Guide template**](https://lp.opendock.com/hubfs/Opendock%20Onboarding%20Kit%20Materials/Opendock%20Driver%20Check-In%20Guide%20Template%20(Make%20a%20Copy).docx?hsLang=en) to outline the steps drivers will follow
- Include QR code instructions and required check-in details
- Print and post the guide at the gate or share it digitally with carriers
- *Note: The QR code shown in examples is for demonstration purposes only. Always use the QR code generated from your own warehouse settings.*
- **Post signage at the gate and other high-traffic entry points**
- **Provide a tablet or device for drivers** who cannot scan the QR code
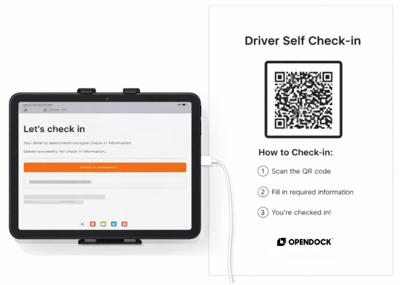
**Goal:** Remove friction at arrival and prevent gate congestion.
#### Train Your Internal Team
Align gate and warehouse staff on the new Driver Check-In flow and designate clear ownership.
- Assign an Internal Site Champion to serve as the point person for setup, questions, and ongoing improvements
- Walk staff through the driver self check-in experience
- Ensure staff knows where and how to communicate with drivers through the platform
- Review how appointment statuses update after check-in
- Confirm how staff should assist drivers when needed
- Reference the [**Driver Check-In Setup Guide**](https://lp.opendock.com/hubfs/Opendock%20Onboarding%20Kit%20Materials/Opendock%20Driver%20Check-In%20Setup%20Checklist.pdf?hsLang=en) to validate setup and ensure all configurations are in place
**Goal:** Ensure staff confidence, consistent execution, and clear ownership.
#### Test Before Going Live
Validate everything works as expected.
- Complete a test driver check-in using the QR code or tablet
- Confirm the appointment status updates correctly in the system
- Verify staff can see and act on arrival information
**Goal:** Catch issues early and avoid day-one friction.
#### Launch and Communicate Expectations
Introduce Driver Check-In to drivers and carriers.
- Share updated carrier instructions
- Reinforce QR code usage with signage and simple guides
**Goal:** Set clear expectations and drive early adoption.
#### Monitor Adoption and Optimize Over Time
Gate Management improves with iteration.
- Review check-in usage and arrival data regularly
- Gather feedback from staff and drivers
- Adjust required fields, instructions, or signage as needed
**Goal:** Improve adoption, speed up gate flow, and reduce congestion.
#### Set Up Driver Check-Out for Your Warehouse
Once check-in is running smoothly, enable Driver Check-Out to capture departure data, complete the gate record, and unlock dwell time visibility across your operation.
### **Configure the Check-Out Form**
- Navigate to the **Check-Out** section under Gate & Yard and enable the form for drivers
**Path:** *Warehouse → Fields & Forms → Gate & Yard → Check-Out → Manage*
- Toggle the **Driver form** on using the **Form Enabled** switch in the top right
- Add or remove fields based on your operational needs. The fields below are common examples to help you get started, but are not required:
- **Seal #** — captures the trailer seal at departure to verify load integrity and support claims or disputes
- **Total Pallets Out** — records the final pallet count after refused or damaged pallets are accounted for
- **Damage Description** — allows drivers to note any damage identified at departure
**Note:** Keep the form simple to start. Begin with only required fields, then introduce optional fields as your team becomes more comfortable with the workflow.
### **Update Carrier Instructions**
- Add clear check-out guidance to your carrier instructions so drivers know what to expect at departure before they arrive
**Path:** *Warehouse → Warehouse Info → Instructions to Carriers → Warehouse General Instructions*
### **Set Up Check-Out at the Gate**
- Each warehouse has a unique self check-out QR code. Download and print the **Check-Out Banner** to post at your facility exit so drivers can scan and check out easily
**Path:** *Warehouse → Settings → Gate Management → Check-Out → Check-Out Banner (Portrait) → Print or Download*
- For drivers who cannot scan, set up a tablet at the exit with the **Warehouse Check-Out URL** open
- Set the **Check-Out Identifier** (default is Phone Number) to ensure drivers are matched to the correct appointment at departure
**Path:** *Warehouse → Settings → Gate Management → Check-Out Identifier*
### **Train Your Internal Team**
- Walk staff through the driver self check-out experience
- Ensure staff knows how to monitor check-out status for active appointments
- Align on what to do if a driver leaves without completing check-out
### **Test Before Going Live**
- Complete a test driver check-out using the QR code or tablet
- Confirm the appointment status updates correctly in the system
- Verify dwell time populates in **Insights** for the test appointment
### **Dwell Time Reporting**
- With both check-in and check-out enabled, Opendock automatically calculates dwell time for every appointment
- When a driver checks out, the appointment is automatically completed and the asset is departed from the YMS
- Review dwell time data in **Insights** to identify patterns, flag outliers, and hold carriers accountable for extended stays
### **Goal**
Capture accurate departure data, support claims documentation, and gain end-to-end visibility into how long every truck spends at your facility.
#### Real-World Adoption Example
One of the world’s leading EV battery manufacturers rolled out Driver Check-In across their facilities.
**Results they achieved:**
- 93% driver adoption
- 5–10 minutes saved per truck check-in
- Reduced gate congestion and manual check-ins
### What They Did to Drive Adoption
- Started with simple load types and check-in questions
- Focused on collecting critical data without overcomplicating the process
- Customized signage and driver instructions per facility
- Educated drivers on QR code usage
- Adapted their setup over time as needs evolved
While there was initial resistance from one-off carriers, most drivers found the process easier after just a few check-ins.
#### Learn More About the Driver Check-In Experience
For teams that want a deeper understanding of the full driver journey, including dwell time tracking and long-term optimization, we’ve created a step-by-step guide that walks through the entire Driver Check-In process from arrival to departure.
This resource is especially helpful for:
- Operations leaders
- Process improvement teams
- Facilities scaling Driver Check-In across multiple sites
[**Read the Step-By-Step Guide to Driver Check-In with Opendock**](https://blog.opendock.com/driver-check-in?gad_source=1&hsLang=en)
#### About Opendock
Opendock is a simple and powerful cloud-based dock scheduling software for warehouses that want to improve dock performance. By connecting shippers, carriers, brokers to the same online scheduling platform, warehouses can reduce detention fees, labor costs, and time spent on phone calls and emails.
[Company](https://opendock.com/)
- [Carrier Login](https://carrier.opendock.com/app/login)
- [Warehouse login](https://nova.opendock.com/login)
- [Blog](https://blog.opendock.com/?hsLang=en)
- [Get a demo](https://opendock.com/#request-a-demo)
Opendock is Powered by Loadsmart Inc. © 2026 - All rights reserved. SOC2 Type II.
- [Terms](https://opendock.com/terms/)
- [Privacy](https://opendock.com/privacy/)
- [Support](https://opendock.com/support/)
- [Security](https://lp.loadsmart.com/security?hsLang=en)